3D Models / Textures


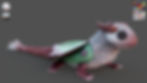
Alien Creature
For this project, I wanted to explore new territory and move away from the themes I’ve previously covered, such as props and human portraits. To challenge myself, I selected an alien creature model as the focus of my work. Although the model was outsourced and already textured, I treated it as a reference rather than copying the existing textures. Rather than opting for the cartoonish style that the original had, I decided to push for a more realistic approach, applying the knowledge I gained from my previous assignment on skin textures. This allowed me to refine my skills in creating detailed, lifelike surfaces while stepping outside my comfort zone.
Alien Creature Turnaround and Lighting
A turnaround of the creature showcasing the contrast in textures between the slime, skin, and shell; following with a 360 light pass.
Kryll Vent Turnaround
Vine Material Turnaround
Yellow Crystal Material Turnaround
Sand Material Turnaround
Alienated Trailer
A hybrid film where I created 3D procedural background assets and layouts to seamlessly match the aesthetic of the 2D characters. I had a great time designing various levels of the environment that the main character, Gary, runs through—more to come!
Alienated Yellow Tree Turnaround
Alienated Yellow Tree Procedural Demo
Alienated Ruffle Vine Turnaround
Alienated Ruffle Vine Shaded, Wireframe, Texture
Alienated Pink Crooked Tree Turnaround


Alienated Environment Progress Work Images
MAKE Visual Dorito Commercial
Under company training, collaborated on a 15 second Dorito commercial with a team of seven. Responsible for the environment concept art, assessing and building clean efficient geometry for sculpting and texturing 3D sci-fi low-poly characters, props, and environment, and lighting in Arnold.


Coraline Matching Progress
For this project, I aimed to capture the spooky and dramatic essence of my favorite shot from Coraline. From texturing to lighting, this is a progress render—more to come!


The Beheaded Texture and XGen
For this project, where the focus was on texturing a head, I wanted to create a beheaded version of Alice from Alice in Wonderland. I thought what the character might have looked like if she had been executed by the Queen of Hearts. I aimed to contrast Alice's innocent appearance with a darker, more gory twist, capturing a clash between purity and corruption. For her face dressing, Alice retains her light blonde hair and wide, bright blue eyes—symbols of her innocence—but with a twist. They’re now tainted by bloodstains, wounds, bloodshot eyes, and smeared makeup that was once flawless. This creates a disturbing yet captivating visual of good versus evil
The Beheaded Lighting
A 360 light pass to showcase the texture and hair groom in different lighting angles.


Dragon Plush Texture and XGen
As a child, I distinctly remember wanting one of those furry moth plushies that were commercialized on every social media platforms, but they were always so expensive. When I received this assignment, I noticed how the dragon shared visual similarities with a Chinese moon moth, particularly in the long tail, wings, and horns. This inspired me to create my ideal plushie, blending both creatures into one. Rather than sticking with the dirtier, stained aesthetic I've explored in past projects, I chose to focus more on the texture aspect for this design. I incorporated velvet fabric, soft moth-like fur, golden threading, minky fabric, and matte button eyes to bring the plushie to life with a variety of tactile qualities.


Adventure Time Van Texture
The van represents both adventure and the journey of a graffiti artist who has roamed the world, leaving their mark on anything they can—including their own van. To reflect their love for exploration, they’ve covered the van with their favorite Adventure Time characters, turning it into a colorful companion on the road. But after so many adventures—maybe a few too many—the van’s dust, scratches, and mud reveal a glimpse of the gritty, well-worn path of a true adventurer.

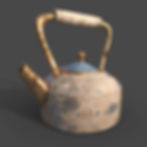

Teapot Texture
This teapot tells the story of time and transformation. Once a cherished piece of functional yet decorative dishware, its base crafted from clay ceramic and its handles and spout forged from brass, it was adorned with whimsical engravings and thick, impasto-like painting. Every detail was carefully and lovingly crafted, reflecting the pride and joy of its maker. Over the years, however, time has left its mark. Rust clings to the brass, dirt has nestled into its crevices, and the vibrant paint has faded, offering a glimpse of its former glory. This teapot, now worn with age, stands as a testament to the hands that once held it and the love it once knew.
Plant Growth
A simulation of alien-like plants growing and scattering for the film 'Alienated.' All assets have been procedurally modeled and textured in Blender using geometry nodes.
Plant Growth Demo
A closer look of the simulation of alien-like plants growing and scattering. In this demo, it displays the nodes used to create the animation growth effect and the method of how I control the growth.

Environment Arnold Render

Arnold Render

Maya and Substance Painter
Environment Arnold Render
A Culinary Adventure Asset List
A project to create a fantasy-inspired home environment for a chef explorer redefining gastronomy. The home resonates with the character’s daily lifestyle, as I’ve modeled, sculpted, and textured the props to echo the navigation and culinary tools the chef would use during their fantastical missions.
A Culinary Adventure
Embark on a mesmerizing culinary odyssey in "Culinary Adventures: A Chef's Quest for Unveiling Exotic Ingredients," where an explorer chef redefines gastronomy. Returning to his enchanting home after daring expeditions, the space brims with artifacts from their journey. The home resonates with echoes of his fantastical missions, promising a sensory journey into the unexplored realms of culinary excellence and imaginary mastery.
A Culinary Adventure Close Up
A close-up shot of the modeled food assets used as a centerpiece for the table. The texture on the ham, the focal point, is hand-painted in Substance Painter to experiment with a painterly style and create more visual interest compared to the other modeled assets.
A Culinary Adventure Mouse Turnaround
This video showcases a close-up turnaround of the mouse asset used in the environment scene. It highlights the final render, wireframe, and shaded versions of the mouse to give an in-depth look at my process. I sculpted the mouse's body in ZBrush, fixed the retopology in Maya, and textured the model using Substance Painter. The mouse is posed sneaking around the chef's kitchen, adding more depth to the storytelling aspect of a chef's kitchen.


Maya and Arnold Render

Radish Girl Render
During this project, I studied human anatomy to accurately form the average child's 3D structure, while incorporating a more 2D style to stay true to the concept art. This approach allowed me to balance realism and stylization, ensuring the character remained charming and expressive. The project also involved intricate detailing of accessories, such as her hat, shoes, and the radish companion, enhancing the overall visual appeal and storytelling of the model.
Radish Girl Shaded and Wireframe Turntable
During the course of ten weeks, I was able to hard surface model this character in Maya. I used the original concept design as my main reference, but because I had not created any human characters before it was a challenge to navigate and model the human anatomy. Therefore, I researched various anatomy parts such as the hands, feet, and face and their wireframes from other artist to optimize my model. At the end of ten weeks, I was able to create a character that I will be texturing very soon!

Maya and Arnold Render

Maya and Arnold Render

Maya and Arnold Render
Maya and Arnold Render
Wooper Burger
A whimsical spinoff between Burger King's Whopper hamburgers and one of Pokémon's cutest creature, Wooper. It's a delightful ode to my childhood, of enjoying both Burger King and Pokémon adventures during family road trips.
Wooper Burger Turntable
In this render, all assets are hard surface modeled in Maya. I've used deformers for the terrain to simulate water and sand. To achieve a stylized look reminiscent of Pokémon's 2D art, I applied a color ramp to the burger shop. This avoids flat color schemes and hyper-realistic textures, creating a pleasing blend of 3D and 2D aesthetics.

Maya and Arnold Render

Maya and Arnold Render
Maya and Arnold Render
Lana's Laundromat
September 2022 - November 2022
During a ten-week timeframe, Lana's Laundromat was created through the animation pipeline of modeling, texturing, lighting, and animating within Maya 2022 and Arnold. The primary aim was to encapsulate the iconic essence of the retro 80's era to evoke the nostalgic and vibrant spirit of that unique period.
Lana's Laundromat Animation
In this environment, I've animated the fan, leaves, clothes, and washing machine. I first utilized the expression editor to create separate rotations between the inner fan panels and the rotation of the outer fan itself. To create a more realistic simulation, I additionally animated the clothes and plants to sway with slight delays to insinuate a slight breeze from the fan. Lastly, I increased the fps in some of the washing machine moving side to side to create the vibrations of a working washing machine.
Lana's Laundromat Process Video
Please enjoy the process video of how I created Lana's Laundromat. It shows the process from a simple blocking ideation, to a final asset wireframe pass, to my first texture and lighting pass, and then to the final animation!